AX 2012 R3 – Filters

Hi,

In AX 2012 R3 WAX has introduced some additional filters to be used against the item, these can be setup as follows:

First we need to configure the default filter,

  1. Navigate to Warehouse management > Setup > Warehouse management Parameters > Filters 
  2. Set the default filter to “!
     2015-08-04_1153

NOTE – If you don’t do this when you come to set your item filter up you will receive the following error: “Item filters cannot use wildcard”

After doing this we will need to setup our filters:

  1. Navigate to Warehouse management > Setup > Filters > Filters
  2. Create two filters for code 1.
    2015-08-04_1200
  3. If you want to make filters for the other codes change the filter title in the drop down.

Next you’re going to want to set this filter against your items, to do this follow these steps:

  1. Navigate to Product information management > Common > Released products
  2. Under the fast tab Warehouse management enter the filter code created above:
    2015-09-03_1450


AX 2012 – Batch Shelf life control

Hi,

This post looks at explaining the ‘Shelf life periods’ in AX 2012.

Through this post we will look at the following areas:

  • Terminology
  • Shelf life setup

Terminology

Before we move onto the shelf life setup in AX we should first understand each of type of date which is available in AX 2012.

The below diagram shows you the four date types in AX 2012 and how each of these periods are calculated:

2015-08-11_1302

The Manufacturing date in AX acts as the starting point to the in calculating the other dates. The manufacturing date can be captured/generated at multiple points:

  • Receiving:
    • Today’s date (this will be the default when the batch is created)
    • Supplier batch date (If the item model group has been setup to use supplier registration the user will have the opportunity to enter a supplier batch date which can then override the manufacturing date)
  • Production:
    • Today’s date (this will be the default when the batch is created)

*NOTE – This depends on when you create the batch. This can either be done manually or by using the item ‘Batch number group’ see the tech net article Number groups.

From the Manufacturing date the following dates can be calculated:

  • Expiration date: The Expiration date is calculated forwards from the manufacturing date using the Shelf life period in days. 
  • Best before date: The Best before date is calculated backwards from the expiration date using the Best before period in days
  • Shelf advice date: The shelf advice date is calculate forward from the manufacturing date using the Shelf advice period in days

Shelf life setup

The Shelf life periods can be setup against a product using the steps below:

  1. Open your products
  2. Click Edit
  3. Scroll to the tab Manage stock and look for the heading Item data
    1. Shelf advice period in days = 3
    2. Shelf life period in days = 10
    3. Best before period in days = 2
      2015-08-11_1347
  4. Save and close the form

Examples: Using the item setup above I will now run through the dates that would appear if I were to receive this product via a Purchase order:

Today’s date = 01/08/2015

  1. Without supplier batch registration:
    1. Manufacturing date = 01/08/2015
    2. Shelf advice date = 04/08/2015
    3. Best before date = 09/08/2015
    4. Expiration date = 11/08/2015
      2015-08-11_1348
  2. With Supplier batch registration (30/07/2015)
    1. Manufacturing date = 30/07/2015
    2. Shelf advice date = 02/08/2015
    3. Best before date = 07/08/2015
    4. Expiration date = 19/08/2015
      2015-08-11_1351

If you have any questions please post them below.

Thanks!

AX 2012 R3 – WAX – Locations

Hi,

This blog is going to cover the location setup within AX 2012 R3 WAX.

To best demonstrate this I’m going to deign a simple warehouse with 2 location zones a Nut zone and a Nut free zone.

2015-08-04_1505

NOTE – Make sure that your warehouse has been activated to use the warehouse management process.


Zone group

The first area you will need to setup will be the zone group, Zone groups group multiple zones.

  1. Navigate to Warehouse management > Setup > Warehouse setup > Zone groups
  2. Click New
  3. Create 2 groups NUT and NUT FREE
    2015-08-04_1508
  4. Close the form

Zones

The first area you will need to setup will be the zones, each zone need to belong to a zone Group.

  1. Navigate to Warehouse management > Setup > Warehouse setup > Zones
  2. Click New
  3. Create 2 zones NUT and NUT FREE
    2015-08-04_1511
  4. Close the form

Location formats 

Next you will need to create the location formats which will make up the naming convention for the locations.

  1. Navigate to Warehouse management > Setup > Warehouse setup > Location formats
  2. Click New
  3. Create 2 location formats one for the Nut zone and one for the nut free zone
  4. In the details section create a new segment.
    1. Segment description – Enter any description
    2. Length – In my example I’m going use a number sequence length of 3 characters
    3. Separator – This acts as a suffix to the number sequence, I’m going to setup the following:
      1. Nut free = “F”
        1. Example – 000F
      2. Nut zone = “N”
        1. Example – 000N
  5. This should leave you with the following:
    2015-08-04_1607
  6. Close the form.

Location profiles 

Next we need to setup the location profiles, these control some of the characteristics of the location.

  1. Navigate to Warehouse management > Setup > Warehouse Setup > Location profiles
  2. Click New
  3. Create 2 profiles NUT and NUT FREE
  4. Create the profiles and ensure that the following are selected:
    1. Use License plate tracking – This enables license plate tracking (more info here)
    2. Allow mixed items – Allows mixed items to be stored in a location
    3. Allow mixed inventory status – Allows mixed inventory status in the location
    4. Allow cycle counting – Allows the user to cycle count the location
      2015-08-04_1629
  5. Save and close the form

NOTE – AX 2012 R3 WAX does offer the ability to define the location dimensions too.


Location setup Wizard 

Now that we’ve configured the zones and profiles we’re ready to generate our locations.

  1. Navigate to Warehouse management > Setup > Warehouse setup > Location setup Wizard 
  2. We are going to be doing two time’s (One for the Nut zone and one for the Non-Nut zone)
  3. NUT setup:
    1. In the wizard screen define the following:
      1. Warehouse – [Your warehouse]
      2. Zone ID – NUT
      3. Location profile ID – NUT
    2. This should generate a line in the grid below in this grid we can now define the number of locations we would like. In my example I’m going to create 4 locations so from location 1 to location 4.
      2015-08-04_1642
    3. Once here click Build to generate the locations
    4. This should generate an info log confirming the locations created:
      2015-08-04_1643
  4. Repeat this setup for Nut Free zone, the only difference should be:
    1. Zone ID = NUT FREE
    2. Location profile Id = NUT FREE
    3. Select the locations 5 to 10
      2015-08-04_1649
    4. Click Build, and confirm the info log:
      2015-08-04_1650
    5. Close the info log.

Validate the locations

Next we need to validate that the locations have been created correctly:

  1. Navigate to Warehouse management > Setup > Warehouse Setup > Locations 
  2. Validate that you have the following:
    2015-08-04_1653
  3. close the form.

Please leave feedback if you need further details (Or you notice a mistake)

Thanks for Reading!

AX 2012 Shipments (Dispatch with pallets)

Hi All,

In this post we will be looking at the standard functions available within AX around shipments using the Pallet transport functionality.

Suggested reading:

http://blogs.msdn.com/b/dynamicsaxscm/archive/2010/12/21/wms-related-question-and-answers-on-dynamics-ax.aspx

http://kurthatlevik.wordpress.com/2012/10/08/shipping-container-labeling-guide/

https://patrickhawker.wordpress.com/2014/05/16/ax-2012-asn-setup/

Firstly we will need to look at our setup for shipments.  Shipments are created and managed through the shipment template, this template will dictate multiple attributes such as the reservation sequence, shipment building logic and the required shipment stages.

SECTION 1

Lets start by setting up our shipment reservation sequence/combinations. AX use’s this shipment reservation screen to control the order in in which AX should reserve the stock attached to your shipment based on warehouse and location type (NOTE – AX will also apply FEFO/FIFO rules too).

  1. Open Stock and warehouse management > Setup > Distribution > Shipment reservation combinations
  2. Within this screen we will define the location priories for our reservations, e.g. Try to reserve against the items picking location first followed by bulk locations etc..
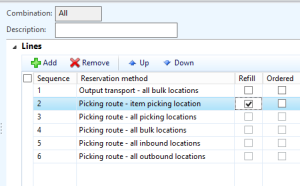
  3. In this screen click New
  4. Create your self a new combination, Below I’ve attached an example of a combination I created which would look to create pallet transports/reserve from the bulk area and then reserve stock in the items primary picking location followed by any picking location followed by bulk locations, outbound location and inbound locations. I have also set my item picking location to trigger pallet refills (we will not generate any in this blog but it will be covered separately at some point!).
    NOTE – For more information on this I would suggest reading this blog: http://axrachit.blogspot.co.uk/2014/04/ax2012-r2-cu7-pallet-transports-part-iv.html
  5. 2014-09-10_1445
  6. NOTE – To understand these methods better I’d suggest reading the msdn article here:  Reservation methods 
  7. Next we need to create the shipment reservation sequence,  the reservation sequence will define which warehouse’s within your site you should reserve against (in order of priority) based on the reservation combination created above.
  8. Open Stock and warehouse management > Setup > Distribution > Shipment reservation sequence 
  9. Create a new sequence, click New 
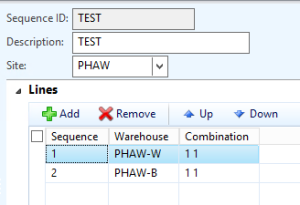
  10. Enter a Sequence Id, description and Site for this rule (these rules are restricted by site).
  11. In my example I have two warehouse’s a main Sales warehouse (PHAW-W) and a bulk storage warehouse (PHAW-B)
  12. Against these warehouse’s select the combination rule created in 4, this should look like this:
    92
  13. Once you have done this close the forms.

SECTION 2

We have now setup out reservation logic for AX to use when reserving stock against our shipments. Next we will need to create our Outbound rule, the outbound rules define how you work through the shipment, such as will loading be required in order to send the shipment.

  1. Open Stock and warehouse management > Setup > Distribution > Outbound rules
  2. Click New 
  3. Give your rule a name and description.
  4. Next you will need to configure the parameters on this screen, these are as follows:
    1. Deliver picked items – Allows you to set your shipment to a status of staged – NOTE – this will not move the picked stock from the stock location into the outbound location. 
    2. Allow send from shipment status – This will enable the ‘Send’ function on the shipment functions screen depending on a specific status.
    3. Auto send shipment – Based on the allow send shipment status AX will automatically post the shipment. (I do not suggest using this as you cannot reverse the sending of a shipment)
    4. Print shipment list – Pre-selects the option to print the shipment list when sending the shipment
    5. Create bill of lading – Pre-selects the option to create the bill of lading
  5. For my example I will be forcing my users to load the shipment prior to sending the shipment and I will be sending it manually. This setup looks like this:
    2014-09-10_1106
  6. Save and close this form.

SECTION 3

We have now setup the different controlling factors for the shipment we can now setup the shipment template. The shipment template acts as a ‘template’ for the processing of shipment which can be controlled based on the output stock transactions, for example if you have a specific customer that you always consolidate their orders rather than sending order by order, or you sell a specific item that needs to be sent in one shipment.

  1.  Open Stock and warehouse management > Setup > Distribution > Shipment templates 
  2. I will be creating a shipment template for my main sales warehouse, PHAW-W, I will also be creating this for a specific customer, 1103. 
  3. Create a new shipment template, Click New 
  4. Set the priory to 1 (Priorities are used by AX to determine the order in which template should be found, so for example you could have a priority of 100 as a sweeping shipment template to pick up and output orders that ‘fell through the net’)
  5. Enter a shipment template in my case “Cave Wholesales – TEST” (This will be the name that appears on your shipment later)
  6. Next will need to fill in the appropriate fields:
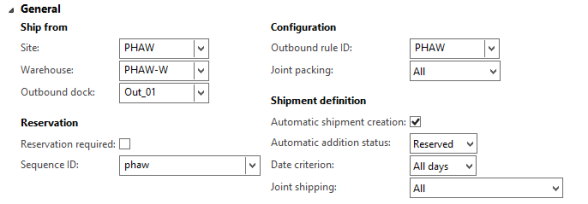
    1. Site – Select your site
    2. Warehouse – Select the warehouse this template should be active for
    3. Outbound dock – This will be the default outbound dock on the shipment when generated
    4. Reservation requirement – This will require the entire shipment to be available for reservation when activating, if un-ticked AX will create a picking rout for the stock that can be reserved.
    5. Sequence ID – [Use sequence created above] *see Section 1 of this post
    6. Outbound rule ID – [Use outbound rule created above] *see Section 2 of this post
    7. Joint packing – Select All – This will guide AX how the orders should grouped when you create picking routes.
    8. Automatic shipment creation – Set this to Ticked – Automatically create shipments using output orders generated in AX.
    9. Automatic addition status – Select Activated – Status in which output orders can be added to the shipment.
    10. Data criterion – Select All days – This will group shipments based on their requested ship date e.g. Today all for today, Next week All orders with request ship date today +7
    11. Joint shipping – Select All – This decides how shipments should be grouped.
      2014-09-10_1120
  7. Next we will need to set the criteria for this template as I will be setting this template for one customer (To give me the correct shipment description), to do this click Criteria this can be found in the tool bar on the shipment screen.
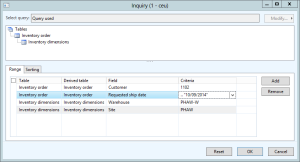
  8. In your inquiry screen click Add and select the following:
    1. Table Inventory order
    2. Derived table – Inventory table
    3. Field – Customer
    4. Criteria – 1103 (in my example)
      2014-09-10_1137
  9. Click OK and save your shipment template.

SECTION 4 

We have now setup our shipment template and other areas around it. Next we will raised the sales order which will generate our shipment. NOTE – You will need to have a pallet controlled item in stock, also your item model group should have ‘Consolidated picking’ selected.

  1. Click Sales and marketing > Common > Sales orders > All sales orders 
  2. Click New 
  3. Raise an order for the customer defined in your shipment template, in my example this would be 1102 
  4. Next raise an order for your required pallet item. The pallets in my example are 100 unit pallets so I’m going to raise an order for 275, 2 full pallets (100 units each) and 75 units pick.
  5. Make sure your order is set to the site and warehouse as defined in your shipment template and click Pick and pack > Picking list (NOTE – you might need to refresh your screen).
  6. Click OK 
  7. Navigate to Stock and warehouse management > Common > Shipments 
  8. You should be able to see a shipment created with your shipment description.

If you want to play with the auto consolidation try creating another sales order for either a different item order the same item and see how this accumulates within the shipment.

SECTION 5

So, we’ve created our shipment based on our sales order/orders. Next we need to pick our shipment, generate our pallet transports  and ship or shipment.

Before you do this make sure that you have stock of the product you are shipping in a Bulk location (this will then generate the required pallet transports).

  1. Find the shipment generated in section 4 and click Functions > Activate. This will Releasing the picking routes and the pallet transports that are associated with the delivery of this shipment.
    NOTE – The shipment, pick and pallet transport should be in a status of Activated.
    2014-09-10_1456
  2. From here we now have a 2 tasks:
    1. Picking route for the 75 units – This would typically be handed to manual picker.
    2. Pallet transport for the 2 full pallet moves.  – This would be handed to the Forklift driver.
  3. We will first deal with the pallet moves, to do this navigate to Stock and warehouse management > Common > Pallet transports 
  4. There should be two pallet transport required for this shipment, one at a time click Start transport and Complete transport to preform the pallet transport.
    2014-09-10_1506
  5. This will now have the set the bulk stock to a status of Picked but it will still be held in the bulk location rather than the destination ‘Outbound location’
    NOTE – This isn’t ideal but for companies that stage their stock and require clear visibility of it, you can however always inquire on the shipment staging screen to see the outbound location of the stock. The stock will be un-available to other pickers and will not show up on counting journals.
    2014-09-10_1513
  6. Next we will need to complete the picking route for the remaining 75 units. To do this navigate to Stock and warehouse management > Common > Picking routes
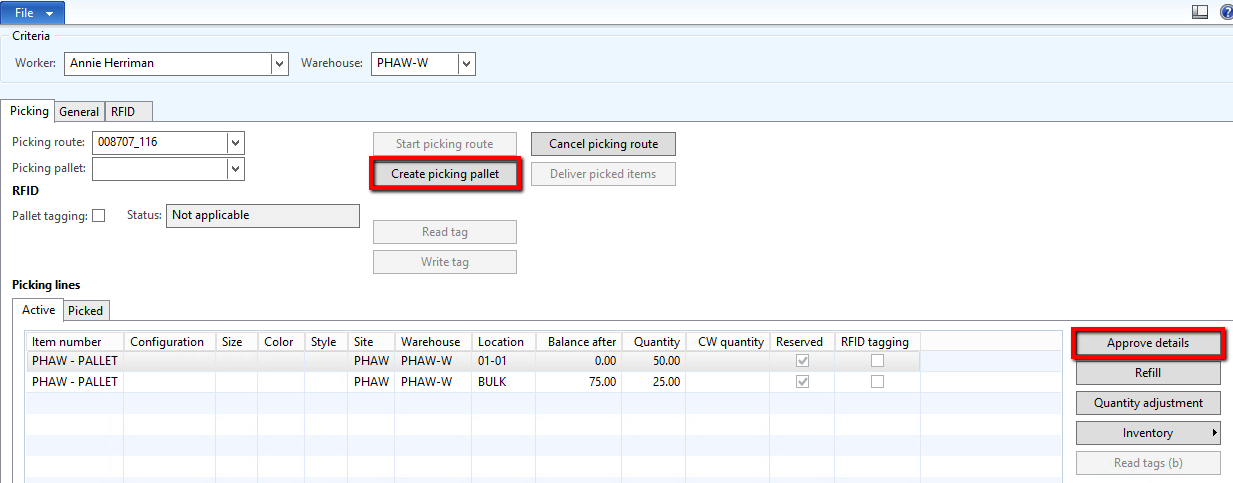
  7. For my picking route I will be using a picking pallet to pick the remaining quantity, 50 units will come from a picking location the other 25 have actually been manually picked from the bulk location. On the Picking route screen select the picking route you would like to work on and click Create picking pallet, Select the pallet type to be used and click OK
    2014-09-10_1518
  8. Next the picker will need to confirm the picked goods, to do this click Approve details, in the screen that open validate the information (e.g. make sure that the pallet being picked from does in-fact have the required goods) and click Pick Selected 
  9. Do this for all lines created, upon posting the final line you will be presented with the option to deliver the items.  When this comes up click Deliver items 
  10. If you navigate to your shipments again you will notice that the shipment has now moved to a status of shipped and the pick and pallet transport should be completed.
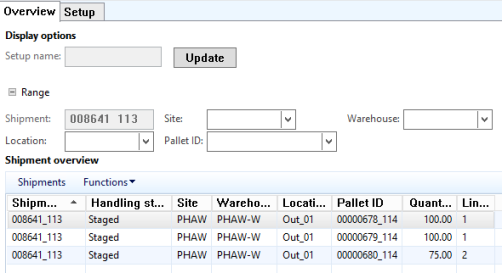
  11. On your shipment click Shipment staging, This should display you with an overview of the pallets picked.
    2014-09-10_1527
  12. We have now picked and staged our shipment. The final step will be to load the pallets onto the shipment, to do this you can either click Functions > Load entire shipment or Load (pallet by pallet)
  13. Upon loading all pallets the shipment will be ready to Send, you can at this point print of your consolidated delivery note and send your ASN. This can be done from the shipment screen by clicking Functions > Delivery note, On the delivery note you then have the option to print the shipping labels generating the delivery note from here will also generate the ASN document. (you can re-send the ASN through the functions Send ASN).
  14. The  final step will now be to set that shipment to ‘Sent’ to do this click Functions > Send from the shipment. This will change your shipment to a status of Sent. 


I hope you manage to work through this successfully! If you have any questions please do comment and I will attempt to get back to you in a timely manner.

Arrival overview (Pallet controlled)

In this post we will be looking at the arrival overview process whilst using pallets.

I will run through an example to satisfy the following business scenario:

In our example our warehouse will be using a standard put away methodology whereby a warehouse worker will unload the pallet onto a receiving station, register the stock  to this inbound dock and generate the necessary pallet movements within the system for the warehouse staff to complete. 

The first step in this walk through will be to create our Item, warehouse and our arrival journals.

You will need to setup the warehouse. To do this use the Warehouse check list.

NOTE – Make sure your locations have sufficient space and max pallet quantities to receive the pallets. In this example we are using the contoso pallet 42″x42″ which has a width of 42. you will also need to assign pallet types groups into your locations. See the screen shot below for an example of the setup:

88


  1. Open Product information management > Common > Released products
  2. Click New > Product
  3. Enter the following:
    1. Product type – Item
    2. Product subtype – Product
    3. Product name – Receive-Test
    4. Item model group – FIFO (or similar)
    5. Item group – (any)
    6. Storage dimension group – (Site, Warehouse, Location and Pallet controlled)
    7. Tracking dimension group –  (Batch physical inventory)
    8. Stock/Purchase/Sales/BOM unit – (any)
    9. Purchase/Sales VAT group – (any)
  4. Click OK.
  5. Open your item main form, you will need to specify the pallet type defaults and quantities that can be loaded onto that pallet. This will be entered in the ‘Manage inventory’ fast tab, populate the fields below:
    • Pallet type – 42″x42″
    • Pallet quantity – 10
    • Min. Output pallet quantity – 1
    • Quantity per layer – 2
      86
  6. On your item selection the ribbon bar option click Manage inventory > Warehouse > Warehouse item 
  7. Create a new line in this form for the warehouse created, then click the tab ‘Locations’ and setup the following information:
    • Store Zone – Select a zone with the store areas your locations can be found in.
    • Default receipt location – Select an inbound location
    • Default issue location – Select an outbound location
    • Use consolidated picking method – According to warehouse setup
    • Picking location – Select your picking location
      85
  8. Save your setup and exit the item screen.

Once you have set the information above up you will need to setup an arrival journal type, this will be used by AX to dictate how the item reacts through the system. To do this follow the instructions below:

  1. Open Inventory and warehouse management > Setup > Journal names, warehouse management 
  2. Create a new Item arrival and select confirm that the following parameters are ticked:
    1. Pallet transports – If you have this tick you will need to be using pallet controlled items. This will generate pallet transports.
    2. Check picking location – If you want to use ’2 stage receive’ i.e. receive the stock onto the inbound dock first then put the stock away to the items default picking location tick this tick box.
    3. Check bulk location – If you are using pallet controlled items you can select this tick box to manage the bulk location put away. (If your picking location is full AX will allocate a Bulk location to put the pallet away).
  3. Save the journal name.

Next you will need to create a Purchase order for the item created before and confirm the purchase order. This should then generate a record within the arrival overview screen.

  1. Open Procurement and sourcing > Common > Purchase orders > All purchase orders
  2. Create a new purchase order for an supplier and select the item created above.
  3. Confirm this purchase order. Note – You don’t need to confirm for the order to show in the arrival overview. However you will need to confirm if you want to generate the purchase receipt from the arrival overview.
  4. Open the arrival overview screen Inventory and warehouse management > Periodic > Arrival overview
  5. Click Setup and select the setup as follows:
    • Restrict to site – Set to the site create above
    • Journal : Name – Set the arrival journal created above
    • Purchase orders – Select the Purchase orders tick box
      Image
  6. Next we can choose to save this setup, to do this click Modify > Save as Select a name and click save.
  7. Navigate back to the overview tab.
  8. In the Display options section there should be an option called Setup name this should allow you to select the setup selected and other versions you might look to setup.
  9. Set your date range to pick up the purchase order created.
  10. Select this purchase order and click Start arrival.
    87       NOTE – The pallet quantity has been calculated at this point
  11. This should bring up an info log detailing the arrival journal created, double clicking this will take you directly to the arrival journal. If you need to find this selection at a later date click Journals > Show arrivals from receipts 
  12. Once in the arrival journal click Lines 
  13. Depending on how many units you ordered you should receive multiple line on this journal (one line for each 10 units representing a pallet each)
  14. On each line you will need to click Functions > Pallet ID 
  15. This will generate a pallet ID for your lines. Upon entering this information click Post
  16.  This should confirm that the journal has been posted.

At this point the inventory will be located at the inbound dock and with a pallet transport on the system awaiting a warehouse worker to put away. Therefore then next step is to pick up and process the pallet transport.

  1. Navigate to Inventory and warehouse management > Common > Pallet transports 
  2. In this screen you should find the pallet transports required to put your stock away
  3. Select the line you would like to put away and click ‘Start transport
    89
  4. You can select the work who will then process this transaction etc… Click OK in this screen
  5. At this point the transport will be in a status of ‘Started‘ you can complete the transport if the location is as expected, if not you can always use the ‘Change destination location‘ function to amend the put away location.
  6. Clicking Complete transport will physically move the stock from the Inbound location to the destination location in a status of ‘Registered’

We now need to post the product receipt to change the status of the stock from Registered to Received 

Next you will need to post the product receipts, the Arrival overview screen will allow you to do this task for multiple arrival journals. To do this follow the steps below:

  1. Open Inventory and warehouse management > Periodic > Arrival overview
  2. Click Journals > Product receipt ready journal 
  3. Select the arrival journals you would like to generate the receipt for and click Functions > Purchase receipt
    Image
  4. The purchase receipt screen will then be loaded and present the user with the opportunity to enter the different purchase receipts:
    Image
  5. Click OK to post these receipts.


Summary 

  • Receive a palletized item
  • Generate a pallet transport
  • Put that stock away

If you have any issues please let me know!


Arrival overview (none pallet contolled)

In this post I’m going to be running through the steps required to process an arrival journal using the arrival process. I will cover the pallet receiving process in a separate blog as it has a few additional parameters to consider. (This is AX 2012 R1/R2).

The first task in setting up our receiving process will be to setup a Basic Item, to do this follow these steps:

  1. Open Product information management > Common > Released products
  2. Click New > Product
  3. Enter the following:
    1. Product type – Item
    2. Product subtype – Product
    3. Product name – Receive-Test
    4. Item model group – FIFO (or similar)
    5. Item group – (any)
    6. Storage dimension group – (Site, Warehouse and location controlled)
    7. Tracking dimension group –  (Batch physical inventory)
    8. Stock/Purchase/Sales/BOM unit – (any)
    9. Purchase/Sales VAT group – (any)
  4. Click OK.

Now you will need to setup the warehouse. To do this use the Warehouse check list.

Once you have set the information above up you will need to setup an arrival journal type, this will be used by AX to dictate how the item reacts through the system. To do this follow the instructions below:

  1. Open Inventory and warehouse management > Setup > Journal names, warehouse management 
  2. Create a new Item arrival and select confirm that the following parameters are un-ticked:
    1. Pallet transports – If you have this tick you will need to be using pallet controlled items. This will generate pallet transports.
    2. Check picking location – If you want to use ‘2 stage receive’ i.e. receive the stock onto the inbound dock first then put the stock away to the items default picking location tick this tick box.
    3. Check bulk location – If you are using pallet controlled items you can select this tick box to manage the bulk location put away.
  3. Save the journal name.

Next you will need to create a Purchase order for the item created before and confirm the purchase order. This should then generate a record within the arrival overview screen.

  1. Open Procurement and sourcing > Common > Purchase orders > All purchase orders
  2. Create a new purchase order for an supplier and select the item created above.
  3. Confirm this purchase order. Note – You don’t need to confirm for the order to show in the arrival overview. However you will need to confirm if you want to generate the purchase receipt from the arrival overview.
  4. Open the arrival overview screen Inventory and warehouse management > Periodic > Arrival overview
  5. Click Setup and select the setup as follows:
    1. Restrict to site – Set to the site create above
    2. Journal : Name – Set the arrival journal created above
    3. Purchase orders – Select the Purchase orders tick box
      Image
  6. Next we can choose to save this setup, to do this click Modify > Save as Select a name and click save.
  7. Navigate back to the overview tab.
  8. In the Display options section there should be an option called Setup name this should allow you to select the setup selected and other versions you might look to setup.
  9. Set your date range to pick up the purchase order created.
  10. Select this purchase order and click Start arrival.
    Image
  11. This should bring up an info log detailing the arrival journal created, double clicking this will take you directly to the arrival journal. If you need to find this selection at a later date click Journals > Show arrivals from receipts 
  12. Once in the arrival journal click Lines 
  13. Once on the arrival journal lines enter the required information including:
    1. Site and warehouse
    2. Put away location
    3. Batch ID
    4. Quantity etc..
  14. On the head click Post This should then post the arrival journal.
    NOTE – If you had the item model group parameter Supplier batch – Purchase registration selected an additional window would appear at this point allowing you to key in the vendor batch details.

Next you will need to post the product receipts, the Arrival overview screen will allow you to do this task for multiple arrival journals. To do this follow the steps below:

  1. Open Inventory and warehouse management > Periodic > Arrival overview
  2. Click Journals > Product receipt ready journal 
  3. Select the arrival journals you would like to generate the receipt for and click Functions > Purchase receipt
    Image
  4. The purchase receipt screen will then be loaded and present the user with the opportunity to enter the different purchase receipts:
    Image
  5. Click OK to post these receipts.

SUMMARY

Above we have completed the following business processes:

  • Overview screen of purchase order scheduled to arrive
  • Start the arrival for these orders and specify the put away locations
  • Update multiple product receipts in one go after checking the stock into its location.

Any questions please do ask!

AX 2012 ASN setup

Below I have detailed the steps involved in setting up ASN for AX 2012 R1/R2:

  1. Open System administration > Setup > Services and AIF > Outbound ports
  2. Create a new Outbound port 
  3. Give the Port a name and description e.g. ASN
  4. In the field Adapter Select the option ‘File system adapter’
  5. Setup a URL/File location for the XML file to be saved to
  6. Click Service operations
  7. In the Popup window find the service ‘InventASNSerivce,read’ and move it to the left hand pane using the chevron ( < )

    69

    a) If you cannot find the service ‘InventASNSerivce’ you will need to register this via                    the AOT. To do this follow the steps below:

    i.    Open the AOT and navigate to Services > InventASNService

                 ii.    Right click Add-ins > Register service

                 iii.   If you refresh your service operations in the outbound port setup these services                     should now be available.

    70

  8. Tick the option ‘Customise documents’ and then select the Data Policies option
  9. Within the Data Policies click Enable all

    71

  10. Then click Close
  11. You can chose to setup different value mappings at this point such as:
    1.  Customer numbers (internal or external)
    2. Address information (internal or external)
    3. Item codes (internal, external and Barcodes)
    4. Units of measure (internal or external)
    5. Currency codes (internal or external)
    6. Delivery methods (internal or external)
    7. Terms of delivery (internal or external)
    8. Charge codes (internal or external)
    9. VAT codes (internal or external)
  12. Activate you outbound port

Now you will need to create a batch job to process your ASN’s, to do this follow these steps:

  1. Open System administration > Setup > Batch groups
  2. Create a new batch group called ASN
  3. Add the appropriate AOS’s to this batch group
  4. Save your changes
  5. Open System administration > Inquires > Batch Jobs > Batch Jobs
  6. Click Ctrl + N, Enter a name for the Job and then click F5
  7. Click View tasks
  8. In the Overview section crate two line with the following setup:
Task description Company accounts Partition Key Class name Class description Has conditions Run location Batch group
ASN [Your legal entity] initial AifOutboundProcessingService AIF outbound processing service No Server ASN
ASN2 [Your legal entity] initial AifGatewaySendService AIF gateway send service No Server ASN


  1. Close the task screen
  2. On the Batch Job screen select Recurrence and set the job to process ever minute (optional time frame)

    72

  3. Click OK
  4. Now you will need to set your batch job to the appropriate status now. To do this click Functions > Change status
  5. Select the status Waiting

Now this has been setup we will be able to validate that this works. to do this follow the steps below:

1. Outbound rule setup as follows:

  Auto Send Shipment Deliver Picked Items Description Outbound Rule Set Picking Line Status To
  No Yes WMS WMS Staged
  1. Create a shipment template to automatically create shipments using the outbound rule above
  2. Generate a Sales order with an item which will be picked up by the template created in step 1. Sales and marketing > Common > Sales orders > All sales order
  3. Generate the output orders for the sales order
  4. Open the shipment screen Inventory and warehouse management > Common > Shipment
  5. Find the shipment created from your sales order.
  6. Activate your shipment Functions > Activate
  7. Open your picking route and pick your order. Inquires > Picking list then Update > Update all
  8. Deliver the items
  9. On the shipment screen click Shipment staging
  10. In the shipment overview click Functions > Load entire shipment
  11. On the shipment screen click Functions > Send 
  12. On the shipment screen click Functions > Delivery note
  13. On the shipment click Functions > Send ASN 

If you now giver the service and the batch job time to process you should find that the XML document has now been created in the designated file location.

Approved vendor list

This post will detail how to create a use the ‘Approve vendor’ functionality within AX.

  1. Set up your item to check for an approved vendor, Open Product information management > Common > Released products 
  2. Within the Purchase fast tab select the field Approved vendor check method Select the option Not allowed or Warning onlyNOTE –

    This setup is item specific however it is defaulted in by the ‘Item model group64

  3. Next you will need to set the vendor’s for which this item has been approve to be sourced from. Open the ribbon tab Purchase and select Setup within the Approved vendor group.65
  4. Setup One approved vendor activated for the current period.
  5. Raise 2 Purchase order’s one for the approved Supplier and one for an unapproved supplier.
  6. Enter the Item you setup into both PO’s and note that for the unapproved vendor a warning or error occurs depending on the setup in step 2.Error – If you set the items ‘Approved vendor check method’ to ‘Not Allowed’ the user will receive an error message which will prevent the user from saving that line.

    Warning – If you set the items ‘Approved vendor check method’ to ‘Warning only’ the user will receive an Warning message which the user can choose to ignore. This warning message will re-occur though-out the processing of this order with the same warning message.


Rebates – R1/R2 – Basics

NOTE R3 has introduced a lot of new functionality in the ‘incentivising’ area including the following:

  • Vendor rebates 
  • Royalties 
  • Brokerage 
  • Trade allowances 

I will not be covering this functionality in this post however I will aim to have a post with this information in the near future. 

AX 2012 R1 and R2 has the capability to use customer rebates in this post I hope illustrate  the potential of rebates.

What are rebates? 

Rebates are used extensively in America but it becoming more common in the UK. Rebates by definition mean that you are returning a specific sum of money after the purchasing of specific product.Rebates in the context of this post are between the manufacturer and a purchaser (most likely a reseller).

Why use rebates?

Rebates are used to as an incentive to improve the effectiveness of selling.

In AX we can use rebates to help incentivise our customers to purchase specific items (new lines for example) and/or order larger quantities of a product. This is done by creating rebate agreements which can grouped and paid for by specific time periods.

AX and rebates

The first area of setting up a rebate in AX consists of creating a rebate program, the Rebate program allows the user to predefine the defaults for the accrual and expense accounts, the next thing to note would be the different Rebate program types; these have been defined below:

  • Rebate:   The rebate type is typically processed by sending a check to the customer or by deducting the rebate amount from the customer’s invoice.
  • TMA:       The Trade and Merchandising Allowance rebates accrue until they are passed on to the customer, which is usually processed by a credit note.
  • Freight:   Freight rebates accrue based on region and are not passed to the customer. They are used only for reporting.

Rebates use a concept similar to trade agreements in terms of how they group the rebates.

Rebate lab

Below i’m going to run through the steps required to create a simple Cumulative rebate agreement for a specific item and a specific customer.

  1. First thing we are going to do is create a rebate program, to do this open Sales and marketing > Setup > Rebate program > Rebate program type 
  2. Click New 
  3. Enter an appropriate name and description (e.g. New Rebate)
  4. Select the rebate type ‘Rebate’ 
  5. Select the accounts ‘Default accrual – 130800‘ and ‘Default expense – 403200
    38
  6. Now we need to create a Rebate agreement, Open Sales and marketing > Setup > Rebate program > Rebate agreements
    39
  7. Click New
    Enter the following information:

    Rebate program

    (use the one created above)

    Customer code*

    Table

    Customer selection

    1203

    Item code*

    Table

    Item selection

    10000

    Unit

    Pcs

    Unit type

    Inventory unit

    Minimum quantity

    1

    Minimum amount

    1

    Start date

    Todays date

    Expiry date

    Never

    Find next

    Tick

    Payment type*

     Pay using Accounts Payable

    Field definitions:

    • Customer code/Item code – As per other areas of AX we are offered the options of:Table (direct link to a specific account/item), Group (link to a group of customers/items) and All (All items / Customers).
    • Payment types – This field defines how the rebate will be paid back to the customer.
  8. Next we will need to fill in the mid section of the form, for this example we will accumulating by invoice taking the Gross price.
    Cumulate – Cumulate sales by Week
    Price – Taken from Gross
    Rebate program accrual account Leave default from program type
    Rebate program expense account Leave default from program type
    Approval required Ticked
  9. In the line details we will enter 2 conditions for the item we are using:
    Customer code Customer selection Item code Item selection Currency Unit From qty. To qty Value Amount type Validated
    Table 1203 Table 10000 USD Pcs 1.00 20.00 10.00 Amount per unit No
    Table 1203 Table 10000 USD Pcs 20.00 30.00 20.00 Amount per unit No
  10. Next validate the Rebate agreements, to do this click ‘Validation’ at the top of the screen.
  11. Next create a Sales order for customer 1203 and item 10000 and a quantity of 10 Pcs. Process this order through to invoiced.
  12. Open Sales and marketing > Common > Rebates > Rebates 
  13. A new rebate should now be created on the rebate from. This rebate should be in a status of To be calculated
    62
  14. Click the function Cumulate in the ribbon bar at the top. In the popup window select the customer you would like to accumulate by and click OK 
  15. You should notice the rebate has now changed to a status of ‘Calculated’ (you might need to refresh your screen)
  16. Click the function ‘Approve’
  17. You should notice the rebate has now changed to a status of ‘Approved’ (you might need to refresh your screen)
  18. Click the function ‘Process’ In the popup window select the customer you would like to accumulate by and click OK 
  19. A popup should come up detailing that a voucher has now been created.
  20. Now the Rebate has been approved and processed we can now pay/credit the customer
  21. Open Sales and marketing > Common > Customers > All customers 
  22. In the ribbon bar click Collect > Settle > Settle open transactions 
  23. Mark the invoice you would like to process
    63
  24. Click Functions > Rebate program 
  25. Again mark the transaction and click Functions > Create credit not (this will create a credit note)

Note – This process has been looking at the ‘Cumulative’ process if you you selected per Invoice, if you did this you can skip steps 12-20.


Security – Part 3 – Security development Tool – Recording

Microsoft introduced a security development tool which helps the user create/identify the required entry points to build a security role within AX.

In this blog I have written a quick walk through guide into using the security development tool. Note that in order to use this walk through effectively I would suggest reading this.

Firstly you will need to install the security development tool, details on this can be found here:

http://technet.microsoft.com/en-us/library/hh859727.aspx

Once installed follow these steps to create a simple Duty which will allow a user to view the inquiry ‘On-hand’ (Stock and warehouse management > Inquiries > On-hand)

Setup

To start with we will create ourselves a new Duty for this demo call it ‘Demo_1’:

  1. Open the AOT (Ctrl+D)
  2. Navigate to Security > Duties
  3. Right click on the ‘Duties’ node and select New Duty
  4. Name the duty ‘Demo_1’ (remember to change the name and the label in the properties pane)

Now to start using the security tool:

  1. Open the security development tool: System administration > Setup > Security > Security entry point permissions 
  2. Click the start recording button
    26
  3. Now carry out your operation in our case it is Stock and warehouse management > inquires > On-Hand I will also navigate to the dimension display button and save a change there.
  4. Open the Security entry point permissions window and click Stop recording
    27
  5. This should return the following values:
    28
  6. Now select the type of ‘Duty’ and enter the name ‘Demo_01’
    30
  7. Tab away from this field, this should bring up a loading bar (don’t worry you will not loose you recording)
  8. Select both of the entry points and right click and select Set entry point permission
    31
  9. Amend these records to have ‘full control’ to do this highlight the two records and then amend the access level using the Bulk update and click Apply
    32
  10. Click Next
  11. Now we need to add a privilege to the duty (this will contain the entry points identified), to do this right click the Duty and click New privilege
    34
  12. Enter the following information then click OK
    33
  13. Next we will attach the entry points to the privilege, right click the newly created privilege and select  Apply entry point access level to selection
    35
  14. This should look like this: 
    36

15. Closing the screen will make the appropriate updates.

To test this newly created duty you can use the ‘Open the security test workspace’ function or you can apply the new duty a user and observe the change. For this example I will use the test work space.

  1. Click Open the security test workspace, Click yes to the info log.
  2. This will open a new work space
  3. Navigate to Stock and warehouse management > inquires > On-Hand 
  4. Check that the appropriate functions have been made available.


KNOWN ISSUES: 

So this product is great and it is really helpful but it is 100% accurate you will probably hit about 90% of the entry points that you need (good starting point) some of the areas I’ve had troubles with include: (I will add more when remember / come across them)

  • Query screens – E.g. the normal on-hand stock form doesn’t register the query form at the start.